Introduction
map-making.app is a tool to make maps for GeoGuessr. It has additional features and many quality-of-life improvements over the official GeoGuessr map maker.
- Tags help you track location distribution and difficulty
- Older street view coverage and official coverage that was overridden by user-uploaded content can still be used in maps
- High performance, supporting up to hundreds of thousands of locations
Creating a map
To create a map, log in to the map maker home page. At the top you can enter a map name and click "Create".

You can now start placing locations.
Migrate your map from GeoGuessr
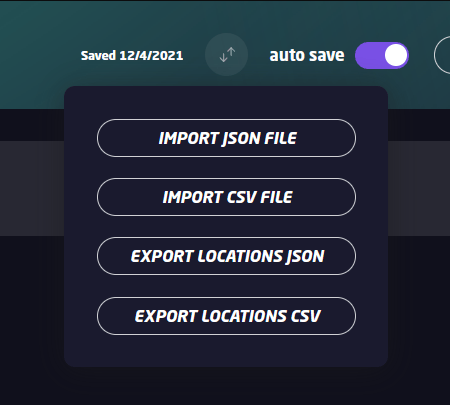
To migrate an existing map, you have to export it on GeoGuessr and import it in this tool. When you are done with your changes, you export the map from this tool, and import it back to GeoGuessr
You can now also use the map-making.app GeoGuessr integration script to do this!
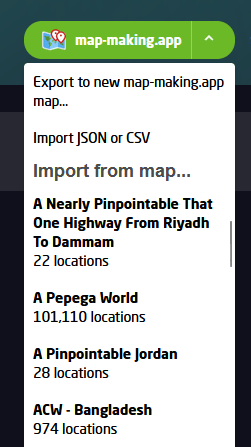
To export your map, open the GeoGuessr map editor. In the top right is a menu:
Click "Export Locations JSON" to download a file containing all your locations. Always use the JSON version, as the CSV format does not save panning and will ruin your map.
Now, you can import that file into the map making app. You can import files into a newly made map, but you can also import files into existing maps to combine the locations.
Generate a map
You can make computer generated maps using https://map-generator-nsj.vercel.app/. Its JSON files are in the GeoGuessr format, so they can be imported without changes.
Import a map
Press the "Import locations from file" button and find your JSON file.
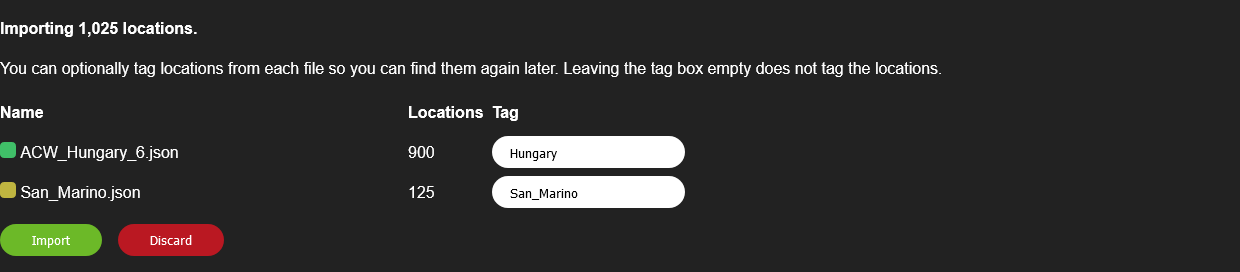
The map maker will show the locations from the file, and how many there are, but doesn't add them to the map yet. You can choose to add the locations to your map using the "Import" button, or to discard the locations.
When importing locations, the map maker can add a tag to all imported locations to identify them. By default it uses the file name, but you can also use something else, or clear the tag name if you don't want to add a tag at all.
Link to GeoGuessr Map
Maps on map-making.app are separate from GeoGuessr maps. To make publishing updates to your maps easier, you can configure the link to your GeGuessr map on map-making.app.
On the map editor page, click the pencil icon:

Then enter the full URL to your map on GeoGuessr. It should look like this:
https://www.geoguessr.com/maps/60a8073f77e14200011bb124
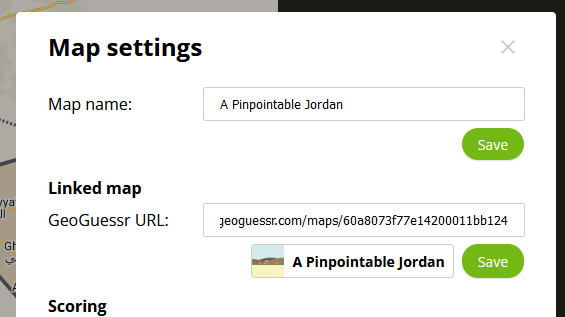
Now you can quickly open the map or the map editor on GeoGuessr from the home page, using the icons next to the map name.

If you are using the map-making.app GeoGuessr integration script, linking your maps also lets you publish your updates with one click!
The Map Maker
The map maker is split in two parts. The map on the left, and a work area on the right.
![]()
The map
The map is similar to what you see in GeoGuessr. It has a few additional features.
Selecting locations
New locations point along the road by default, instead of always pointing straight north. It picks whichever direction Google provides first, so it can be pointing north, south, or anywhere depending on the panorama, but always along the road. Usually this gives you a much better starting point.
When you click a road, the map maker will try to prefer official Google coverage over unofficial user-uploaded coverage. If both exist in the same spot, the location you selected will automatically become a "pano ID" location. A pano ID location will always show the exact image you selected, even if newer coverage was uploaded at the same coordinates.
When you hover your mouse over a road, you will see a small preview in the bottom left. It shows what you would see in street view (pointed along the road), and the date of the coverage. This is mostly meant so you can check if a road has Gen 1 coverage without clicking it, but you can of course use it in any way you like.
All the above features can be disabled in "Map settings".
Coverage lines
The blue lines on the map indicate street view coverage.
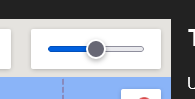
Since coverage lines appear on top of roads, they sometimes obscure road names, or even city names if you're more zoomed out. You can use the slider in the top right to make the lines more or less transparent, or even invisible.
In the top left of the map is the Map Type menu, housing settings for the map style and coverage lines. Hover or click it to open it.

By default Google shows lines for all types of coverage, including user-uploaded images, photospheres, and trekkers. You can select the type of coverage you want to see: official (car coverage and trekkers), unofficial (user-uploaded), or all.
| All | Official | Unofficial |
|---|---|---|
 |  |  |
Blue isn't always the clearest colour for the lines, especially with different map styles. If necessary, use the swatch below the coverage dropdown to change the colour of the lines.
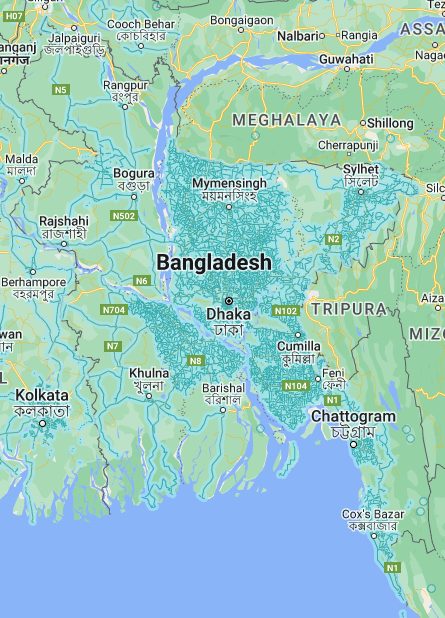
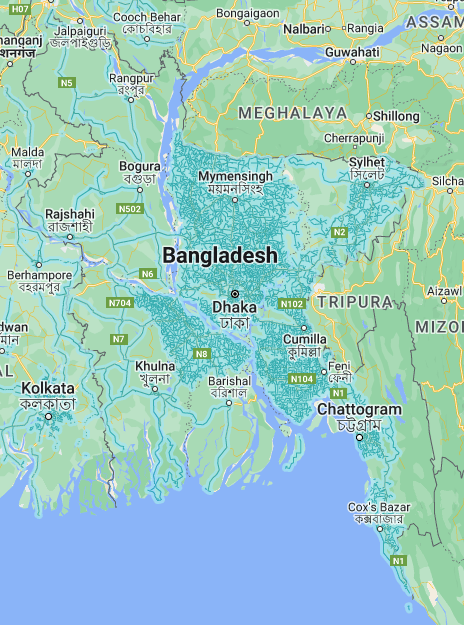
The default coverage lines are quite prominent so you can see where the coverage is. If you are working in a smaller area you can make the lines thinner to more easily see the underlying features like roads and POIs.
| Normal | Higher resolution |
|---|---|
 |  |
Measurements
You can make measurements directly on the map. This is most useful for maps that are intended to be 5Kable with moving. You can draw paths with many points, so you can measure how far of a drive it is from one location to an area with information, to see if that is acceptable for your map. You can also just use it to check that you're not placing many locations too close together.
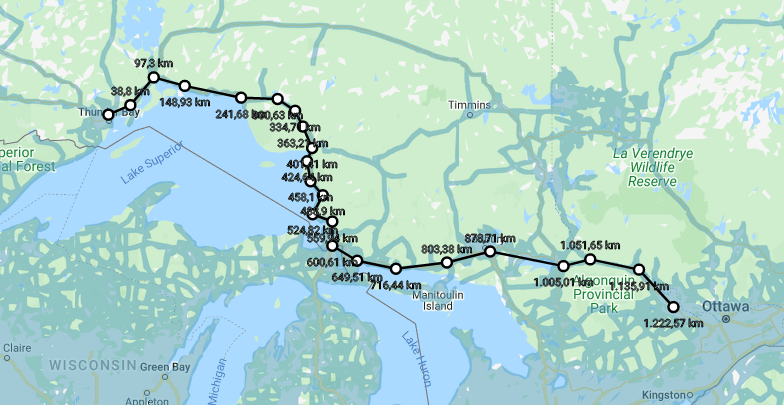
Right-click the map and click "Start measurement" to start a measurement. Then click the map to add a new point to your measurement path. You can drag points to move them, or click points to delete them from the path. If you're measuring a road length, you can start by clicking the start and end, and then add new points in the middle of the path by clicking on the line between points to measure details like turns.
While making a measurement, the map is not interactive. To add or select locations again, right-click the map and click "Clear measurement".
![]()
5K Circle
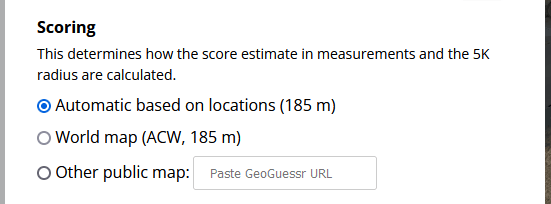
A common use for measuring is to check if a location is within the maximum distance for a 5K score from a pinpointable feature on the map. The app can display a radius around the selected location showing where players can guess to get a perfect score. Select "Display 5K Circle" in the map settings:
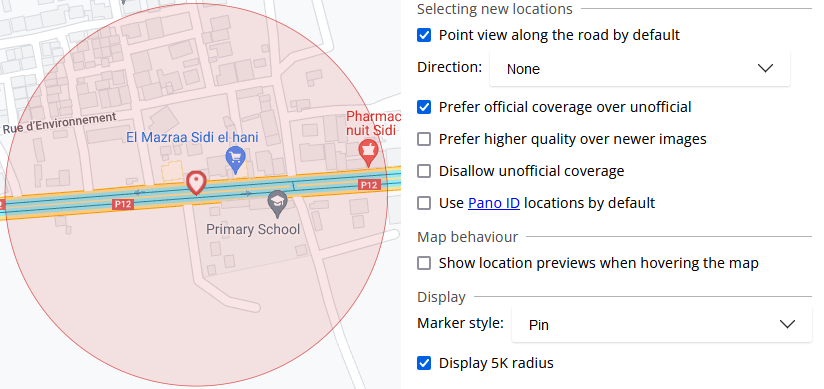
The range is calculated based on the locations in the map. Community map projects often have individuals working on smaller maps that become part of one big map. In that case you'd want the 5K circle to indicate the distance for the whole map: not just your part of it. You can change the range used in the settings for the map, using the pencil icon at the top of the screen.
Latitude/longitude Anchor
When an anchor is set, map-making.app draws latitude and longitude lines coming from the anchor. This is mainly used for Equilibre, a custom challenge style common in the La Ligue community. The lines are used as reference to place multiple locations at the exact same latitude or longitude across the world.
To set or clear an anchor, right-click the map where you want the anchor to be. Only one anchor can be set at a time.
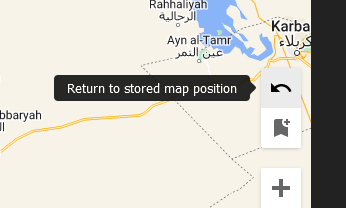
Store Viewport
If you have a big map, you likely only work on a small area of it most of the time. You can store a viewport using the button in the bottom right to quickly return to a specific area and zoom level.

This is like setting a checkpoint on the map. You can then return to the same area and zoom level using the Return button:
The Location Editor
When opening a location, you can view and edit it.
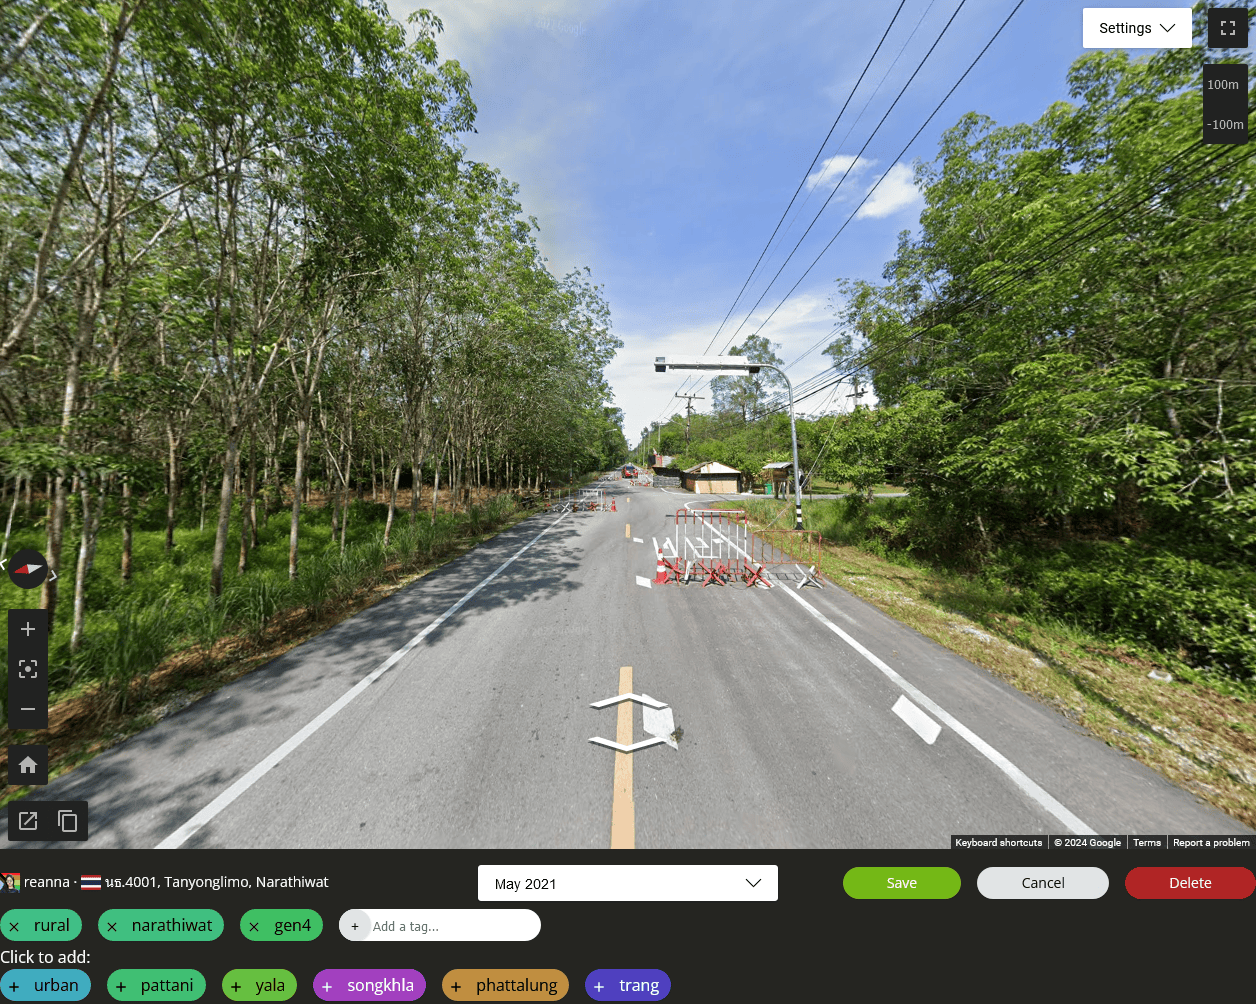
The street view window shows what the round will be like in a game. You can move and pan around in the street view and then click save to update the location.
Below the street view, you can see the description, the coverage date, and the save/delete buttons.

Compass

The compass is similar to the GeoGuessr one. The red arrow of the compass points north.
The little arrows around the compass show where linked panoramas go. Usually these will point along the road. You can click the arrows to point the camera in that direction.
Click the compass itself (or use the N keyboard shortcut) to point straight north. Hold Ctrl while clicking to cycle through the linked panorama directions.
Image date
One of this tool's core features is the ability to select specific coverage dates. This uses a technique called "pano ID", which was discovered by community members. A normal GeoGuessr location stores a coordinate, and then loads an image at that coordinate when you play the game. If someone uploads unofficial coverage or if Google updates the area, those images can be loaded instead of the one you picked while making the map. This is nice in the case of official updates, but less so if a high-quality official image is overwritten by a low-quality third-party image. On the other hand, pano ID locations refer to a single specific image. That allows you to select older images, or images overwritten by low-quality unofficial footage.

In the image date dropdown, only the final "Default" entry is a coordinate-based location. Selecting any specific date turns the location into a pano ID location. Unofficial coverage is marked with "(unofficial)".
You can use PageUp and PageDown keys to cycle through coverage dates without using this dropdown.
Tags
You can tag locations with anything you want. Many people use tags to track urban/rural distribution, but you can use them to track geographic distribution too. You can also use tags for particularly interesting locations so you can find them again later.

The tags attached to this location are shown on the first line. You can type new tag names into the "Add a tag…" box. Below, there are other tags, that you can quickly add to this location with the + button.
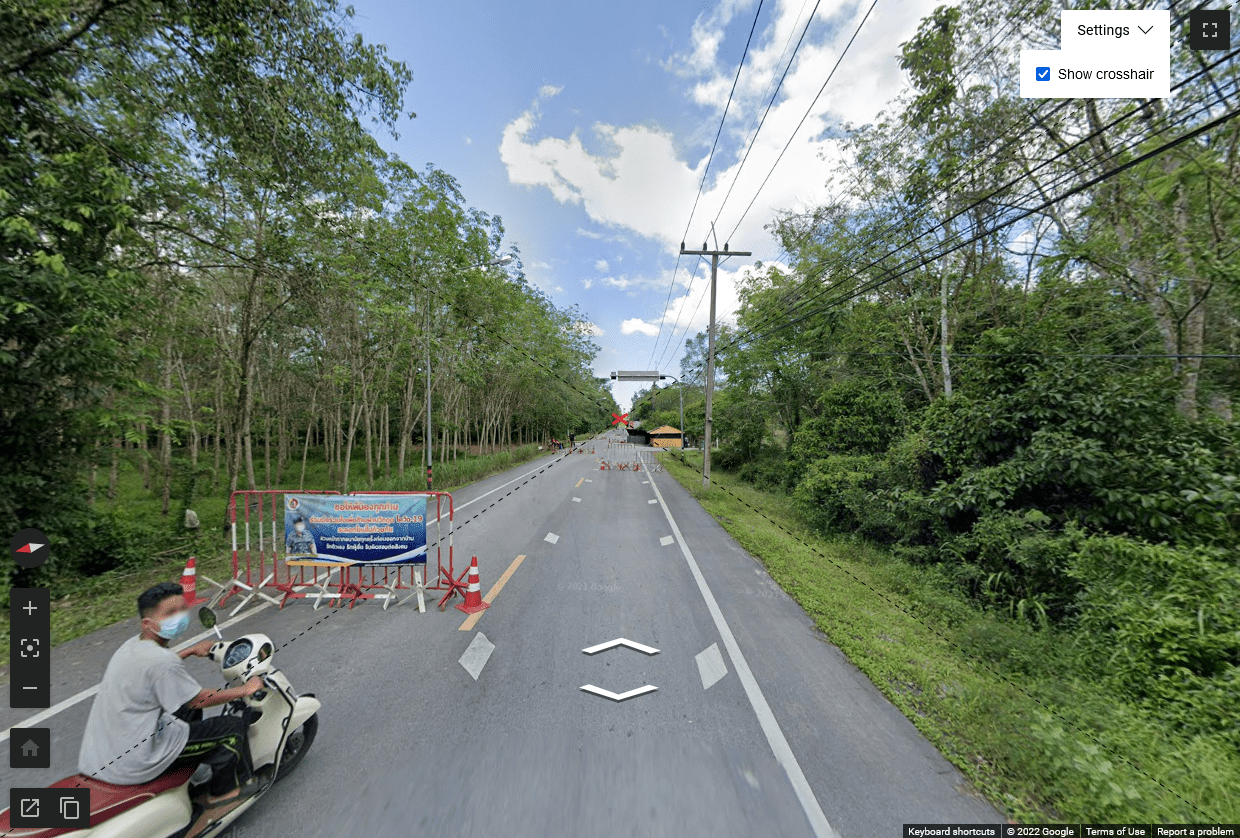
Crosshair
In the Settings menu, you can enable a crosshair to help panning your locations. The crosshair marks the centre of the image, so you can align the camera more precisely along the road, or point it at the horizon, or whatever would make sense for your map.
Keyboard shortcuts
Global
| Action | Keys |
|---|---|
| Focus search bar | Control+f |
| Import a Street View link from the clipboard | Control+v |
| Import a JSON file from the clipboard | Control+v |
| Save the map | Control+s |
| Select all locations | Control+a |
| Undo | Control+z |
| Redo | Control+y |
Undo/redo only works up to your most recent save. Once you saved the map you cannot undo past that point.
Location Editor
| Action | Keys |
|---|---|
| Enter/exit fullscreen | f |
| Zoom in one step | + |
| Zoom out one step | - |
| Return to spawn | r |
| Reset panning to the north | n |
| Switch to next available coverage date | PageUp |
| Switch to previous available coverage date | PageDown |
| Copy link to the location in Street View | Control+c |
| Save the location | Enter |
| Close the location without saving | Escape |
| Delete the location | Delete |
Review mode
| Action | Keys |
|---|---|
| Go to next location | Control+Left |
| Go to previous location | Control+Left |
| Save location and go to next | Enter |
| Delete location and go to next | Delete |
GeoGuessr integration script
The map maker is a separate website, so it can't access or save your maps to GeoGuessr. You can use a script to migrate maps to map-making.app and publish changes back to GeoGuessr.
Installation
The script needs access to GeoGuessr and map-making.app, so there are a few setup steps. You only need to do this once.
-
Install the Tampermonkey extension in your browser: https://www.tampermonkey.net/
-
If you are using Google Chrome, you have to enable "Developer mode" for Tampermonkey. Please follow the instructions here.
-
Open the map-making.app userscript. It should prompt you to install the script.
-
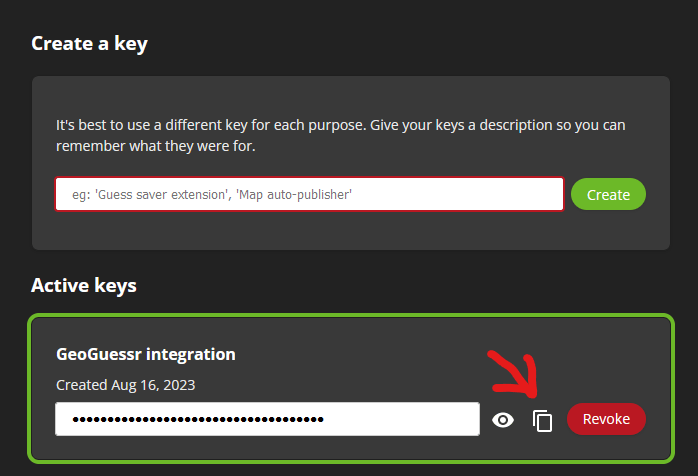
Create a map-making.app API key. This key will give the script access to your maps so don't share it with other people. Give it a recognisable name, for example "GeoGuessr integration". After creating it, copy the API key using this button:
-
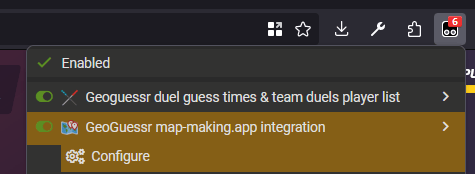
Open a GeoGuessr tab. In the Tampermonkey menu, you should find the Configure option for the GeoGuessr map-making.app integration:
Depending on your browser, the Tampermonkey icon may be hidden inside an Extensions menu.
If you do not see the script in Chrome, make sure you did step 2.
-
This opens a dialog on the page. Paste your API key and click "Done".
Now, you can import and export maps directly from the GeoGuessr map maker.
Migrate maps from GeoGuessr
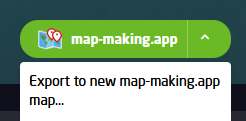
Open the map in the GeoGuessr map maker. The map-making.app button has an export option:
Confirm the name you want the map to have on map-making.app. The script will create the map with the locations from GeoGuessr, and open map-making.app in a new tab.
Publish maps to GeoGuessr
With the userscript you can load maps directly from map-making.app without exporting a JSON first.
Currently the userscript only supports default export settings. If you use custom export settings, you still need to use JSON files for now.
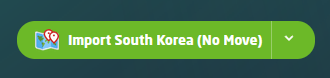
Open the map in the GeoGuessr map maker. If you have linked your map-making.app and GeoGuessr maps, you can click the map-making.app button to instantly import the locations back to GeoGuessr.
Otherwise, use the dropdown to find the correct map.
If you are not importing from a map-making.app map directly, you can still use the "Import JSON or CSV" option to import any file.
Other tools and resources
map-making.app is only one of many tools that can be useful for making GeoGuessr maps.
MapCheckr
https://mapcheckr.vercel.app/ by MrAmericanMike and RollinHill checks all the locations in your map as GeoGuessr would, and tells you if any are broken or undesirable. This way you can remove gen 1, trekkers, or unofficial coverage from your map. If you make your map in map-making.app, you can avoid those cases initially, but over time new Street View coverage can be published or deleted, and MapCheckr can help you find out. To use it with map-making.app, export your map as JSON and import it into MapCheckr. You can do this again every few weeks or months to check for new problems.
Map Generator
https://map-generator.vercel.app by RollinHill picks random locations in an area of your choice. You can use this to computer-generate a starting point for your maps, but you can also use the generated data in other ways. For example, if you're picking locations in an area with a lot of Gen 1 coverage, you can use the Map Generator with a date filter to find out which roads have more recent, higher-quality images.
This tool is also used a lot to discover new street view coverage as it is released.
There's also the "nsj" Map Generator, an expanded version by Nur, Niels, and other community members, available at https://map-generator-nsj.vercel.app/. You can see if its additional options are useful to you. It also supports marker clustering which has better performance if you're generating many thousands of locations.
pano-tools
https://geo.emily.bz/pano-tools by emilyapocalypse can automatically assign pano IDs to existing maps to avoid unofficial coverage. You can also use it to bulk-update maps to new coverage or to remove pano IDs entirely, which can be necessary when interacting with other tools.
Map Links
http://map-links.vercel.app/ by Nur finds all linked panoramas starting from one source panorama. Linked panoramas are the ones that you can get to by clicking the arrows in Street View. This tool is mostly useful if you are working with hidden coverage. You can enter one panorama into it, and find out where the hidden coverage goes.
SV-Map
https://sv-map.netlify.app/ shows the official blue lines layer, and archives blue lines layers at different dates. You can find newly covered roads by comparing the blue lines across time.
GeoGuessr Maps List Enhanced
This great userscript by Kommu makes GeoGuessr's "My Maps" listing usable, by sorting the maps and displaying them in a nice table.
https://openuserjs.org/scripts/kommu/GeoGuessr_Maps_List_Enhanced
Exporting a map
This is documentation for people who do not want to use the GeoGuessr integration script, or who need to use custom export settings. Are you using the userscript? Use these instructions instead.
The map maker is a separate website, so it can't just save your maps to GeoGuessr. Instead, you need to export your map and import it in GeoGuessr using a script.
To export a map, open it in the map maker, and click "Export". You can choose to export the entire map, or only your current selection.
You can download the map in different formats: JSON, CSV, and GeoJSON. JSON is almost always the one you want. You can use GeoJSON or CSV if needed for other tools.
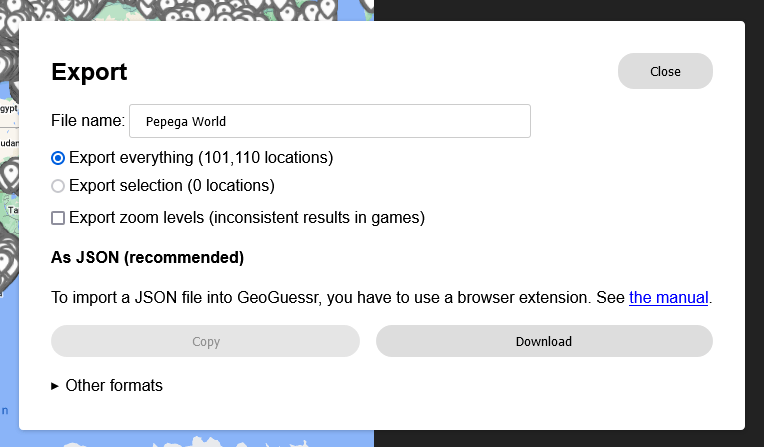
You can optionally export zoom levels for all locations. The effect a zoom level has on the final location depends on the screen resolution and aspect ratio of each player. By not exporting a zoom level, GeoGuessr's default zoom is used. If you export the zoom levels, you can make your locations more zoomed-in than normal. If you are not sure if you need it, do not use it, as for most maps it produces a less enjoyable result.
Publishing the map on GeoGuessr
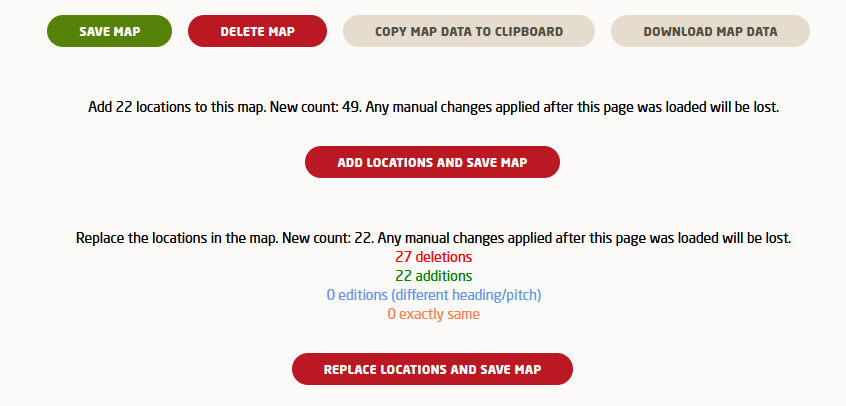
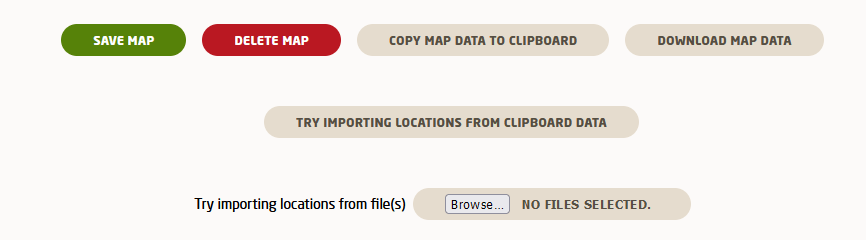
You now need to import the generated JSON file back to GeoGuessr. GeoGuessr has an import/export feature. This feature adds locations to the map: it does not overwrite them. When working with map-making.app maps, you almost always want to overwrite the locations instead.
To do this, you need to use a browser extension made by community member slashpeek.
-
Install the Tampermonkey extension in your browser: https://www.tampermonkey.net/
-
If you are using Google Chrome, you have to enable "Developer mode" for Tampermonkey. Please follow the instructions here.
-
Install the Copy/paste Geoguessr map data script. Click the blue "Install" button.
-
For the extension to work, you need to have an already-saved map on GeoGuessr. If you are creating a new map, just select 5 dummy locations anywhere in the world in the GeoGuessr map maker and save the map.
-
Go to the edit page for the map, and you should see "Try importing locations from file(s)" at the bottom. Click the button and find your exported JSON file.
-
Click "Replace locations and save map" to finish the import.